
Estimated read time: 8 minutes
I think when many people begin to crochet they hate swatching. It seems like just one more stupid thing to keep you from starting the project you are so excited to start, not to mention being a potential waste of yarn. When you begin making more complex things and designing your own patterns, you realize that there are two types of swatching. There is the experimental swatching you do to see which stitch patterns work best with which yarns and hooks, which is endlessly fun and teaches you so much about creating awesome fabric. Then there is the functional swatching you do to prepare for a project.
Experimental swatching may or may not lead to a project. It could just be about trying out yarn or a new stitch pattern. Functional swatching is about working with the hook, yarn, and stitch pattern you will use in an upcoming project so that you can plan that project out to work exactly with your chosen yarn, hook, and stitch pattern. It is purposeful and very effective in planning your design.
The swatch is the most important part of any project because it establishes how your particular stitch pattern, yarn, and hook size will work to create the fabric you are making and how those swatch measurements will translate to your pattern. It will be the basis for all parts of your planning process. On one hand, this is awesome because you can use this little sample of fabric to plan a perfect, bespoke sweater, a simple scarf, fingerless gloves, a shawl, or any other item that you can think of, so long as you are using the same yarn, stitch pattern, and hook combination on your swatch and your finished project. On the other hand, mess it up and the whole pattern can be a frogging nightmare.
This is not just about getting the measurements right for your pattern though. You should use this opportunity to test out your stitch pattern with the hook and yarn size you have chosen. Make sure they all play well together and that you are getting a nice fabric that has the drape you want and that displays the stitches well. There are so many considerations about which yarn, hook size, and stitch pattern to use together. Use this swatching time to refine all of your choices about yarn, hook, and stitch pattern before you go on.
So let’s get this swatch bit right. First, make a big swatch. Most swatches are four inches by four inches. This is just too small to tell how little bits of the pattern will change over more rows, and your project is likely going to have a lot of rows. So blow this up to a twelve by twelve inch (30 cm by 30 cm) swatch, at least. If you have time, inclination, and yarn for it, make a scarf or a shawl in the stitch pattern first to see how the stitch pattern measures out over a lot of rows. The more rows you can base your measurements on, the better. Treat yourself to a swatch scarf! But remember to have fun with it. Just because your scarf is secretly a swatch doesn’t mean it can’t have cool color changes, a funky border, or some creative embroidery or motifs.
Once you have created your large swatch, wash it and block it. Go all out. Pin it down so the stitch pattern is opened up and on full display or don’t, if that’s not the look you are going for. Whatever you do, wash and block the swatch as you plan to wash and block the finished project. If you plan to do a strong, wet blocking, do that with the swatch. If you plan to do a damp, light blocking, do that with the swatch. Without this step, you will be crocheting blind into the void of Stretchings from Washings to Come. Do not torture yourself this way. Let your swatch dry in the sun and tell it happy stories about the part it will play in your project. Make it feel good about itself.
Once your swatch is dry and happy to contribute to your project, lay it flat and grab your measuring tool of choice. You want to take several measurements. Measure from top to bottom, starting a row or two in from both edges. Count the pattern repeats and the individual rows. If you are working in all one stitch, you will have so many rows over a set number of inches or centimeters. If you are working in a lace pattern with a several row repeat, you want to note how many whole repeats there are in your swatch as well as how many rows there are. Make note of both of those numbers. Do the same going side to side, also starting a few stitches in from the edges.
Some stitch patterns can be fussy about where and how they increase. You may have to work a project a little longer than planned sometimes to make the pattern repeats come out as you want. I like to know the height and width of an individual repeat in these cases because it really helps me to get a clear picture of my project, so be sure to take that measurement as well.
Now you want to write down your measurements and keep them handy. For the width, they should look something like:
10 inches/26 centimeters = 17 stitch pattern repeats
And/Or
10 inches/26 centimeters = 51 stitches
And for the height:
10 inches/26 centimeters = 8 pattern repeats
And/Or
10 inches/26 centimeters = 40 rows
The width measurements of your swatch will be used for circumference and other horizontal measurements; length measurements will be used for vertical measurements.
This next step is the other crucial time for your project. (If you haven’t noticed yet, every planning step is super important. Ignore them at your peril!) You need to have really good measurements for the size of the project itself if you want your project to be a perfect fit or size. If you are creating a scarf or a wrap, you can just go with your desired final dimensions and work toward that sort of on the fly or you can do this super evil algebraic proportion problem, if you like, to get your row count. It looks like this (it is sneering at you):
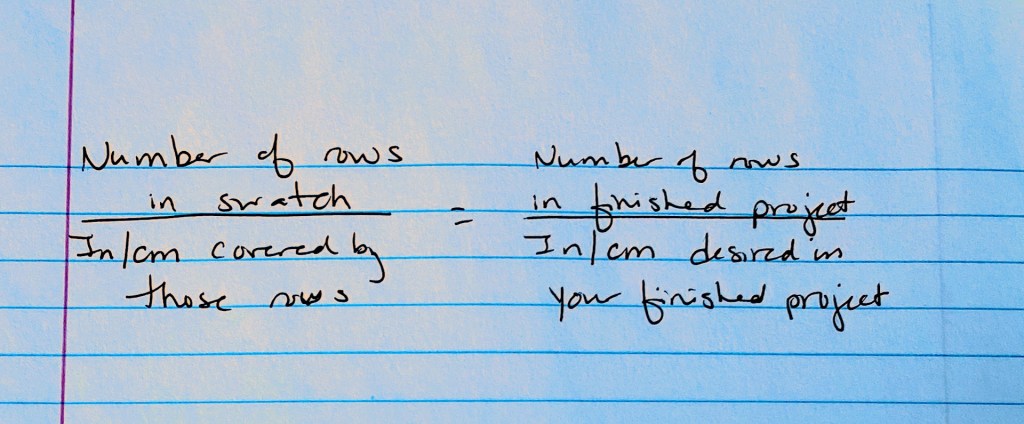
This setup is very important. If you put the number of rows on the top of one bit, you need to put the number of rows on the top of the other bit. Each side of the equation needs to have the same element in the same place. If inches/centimeters are the bottom on one side, put them on the bottom on the other side. If you do not do this, space time will break down and the universe will dissolve. Not really, but it will feel like when your project flops. This is it folks. This is when we will need this knowledge. It feels bitter.
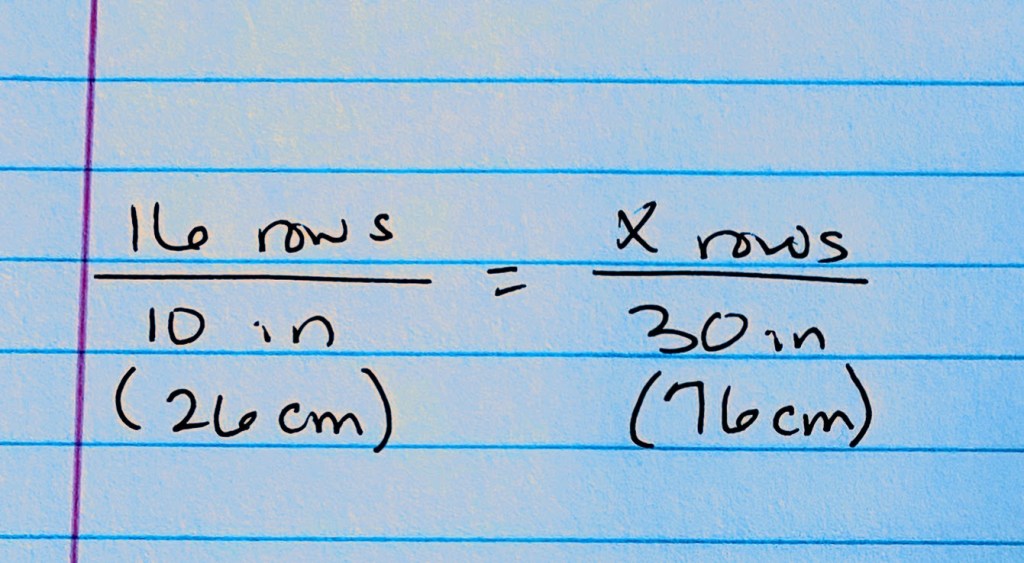
So if your swatch has 16 rows over 10 inches/26 centimeters and you want the final project to be 30 inches/76 centimeters long, your problem would look like this:
Horrifically, at this point, you cross multiply, using inches in this case because I am only working the damn thing one time so extrapolate please, getting:
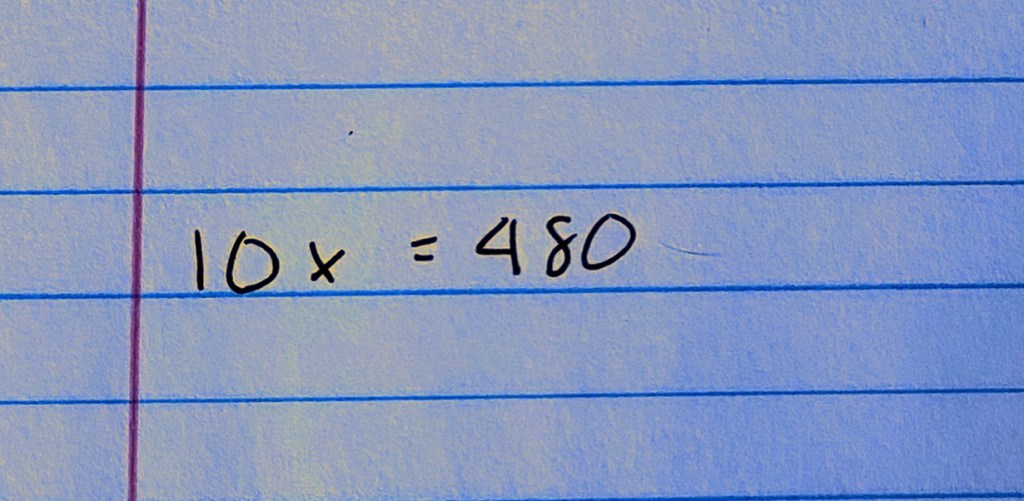
Then you divide both sides by 10 (please hang on, it is almost over)

When you divide that, you get
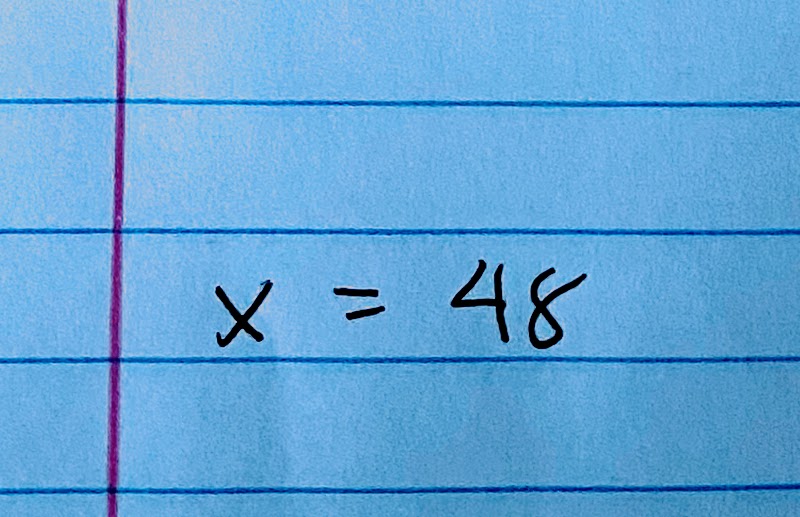
What this means is that you will need to work 48 rows of your project to get it to 30 inches/76 centimeters long. You can do the same problem with inches/centimeters and side to side gauge to figure out how many stitches to add to get a project to your desired width.
This hurts me as much as it does you. It is painfully like real math. You can use a calculator, though. We all have them now. It seems a shame to waste them. You can wear your jammies. You can make someone else do it for you and not be accused of cheating. Not at all! You are just using your resources wisely and effectively. I am sorry there is math. As a very strict humanities person, it horrifies me how much math plagues my crafting life. This is my comeuppance.
There is another way, probably because the math-lazy people needed it and the universe understood and took pity on us. So if algebra makes you physically ill, as it does me, divide your planned project measurement by the inches or centimeters in your swatch measurement and then multiply that by the number of stitches or repeats in your swatch measurement. The number you get, if the universe has smiled upon you, will be the number of rows you should have. It looks like this:
60 inches/152 centimeters planned for scarf length = 7.5 inches or 7.6 cm
8 inches/20 centimeters swatch measurement
7.5 inches or 7.6 cm x 20 rows in swatch measurement = 150/152 rows
The second, non-algebra based method, is the method I use to make my swatch and my measurements work. If you have your own way, please do that. If you actually understand math really well, please feel free to post a comment and tell the rest of us what to do. Or drop me a line. I’ll set you up with an “Ask the math-wise” guest post. If it turns out that my second method is actually algebra parading around as not algebra, do not tell me. I will be happier not knowing that I not only needed to know algebra but that I use it regularly. Let me live in ignorance of my algebra use!
If you are making a sweater, you need a lot of measurements and significantly more math. I am deeply sorry. You will need the following measurements:
______Neck
______Torso at bottom of planned yoke
______Circumference of arms and torso at the same point
______Circumference of arms alone at the same point
______Distance from the end of the turtleneck band to the end of the yoke
(straight down)
______Distance from the end of the turtleneck band to the waist
______Waist measurement
______Length from the waist to the planned bottom of the sweater
______Circumference of body at the planned bottom of the sweater
______Length from the end of the turtleneck band to the planned bottom of
the sweater
______Length of arm from the end of the turtleneck band to the wrist
______Length of arm from the bottom of the yoke to the wrist
______Circumference of arm just above elbow
Once you have these measurements, grab your swatch and your measurements and get to work using the terrible math outlined above to translate your swatch into plans for a sweater. Turning each measurement for the sweater into a plan with rows and repeats will give you a basic outline of your sweater. From this, you can figure out how many increases or decreases you will make over how many rows; how many stitches to start with; how many rows to work to finish each element from the yoke to the body to the sleeves.
I like to draw, very badly, two little schematics for myself and write my measurements on one and the stitch and row counts on the other. Then I write my pattern based on these notations. Often, I only write out the next step I am going to take and wait to write out the rest until I finish the bit I was working on. For instance, I write out and then work the yoke, assess where I am, and then write out the torso or the sleeves. It’s up to you. You should have enough information from your swatch and your measurements to outline whatever project you are dreaming of.
Swatches are our best design tool. Use them well and often and your own design adventures will be so much easier.


Leave a comment